Sunday, August 19, 2007

Handspun Wrist Wallet


Handspun Wrist Wallet

this is a super quick project to knit and good for teaching beginners some knitting techniques.

adding the zipper might take you the longest out of the whole project!!

Materials:

worsted weight yarn handspun/dyed looks best but you can use store bought too

and a 4.00mm 32"circ and the same size dpn's

I used a old zipper from some jeans

needle and thread


ok lets start:
cast on 5 sts


knit each row for 8 inches....if you want your wallet just a tad bigger go for 9 inches


join and knit both ends tog to make a tube casting off as you go, so you will have 1 st left


this is where the circ comes in for the magic loop


on the same side as your last st, pick up and knit one st at each garter st bump.


the number of sts arn't critical after all it's just a wallet


*knit 2 sts, knit in the front and back of next st* around


you might not have enough sts to knit this evenly around the wallet... thats ok, just go with it!


then knit even for 1 inch, for me that was 6 rows


purl 1 row


knit 3 rows


purl 1 row


knit 1 row


*knit 2 sts, knit2tog* around (fudge it if you have to) ;)


*knit 1 st, knit2tog* around


knit2tog around


you should have 6, 7, 8?? sts left on each needle


kitchener these tog.


tuck in ends


with the dpns cast on 3 sts and make a I-cord.


make this long enough that when the ends are together you can put your hand through the loop.


sew this onto the end of the wallet where you cast off.


now sew your zipper , you might have to cut the zipper a bit shorter, I made the opening about 4.5 inches.


I can fit my credit cards, change, cell phone and my van keys inside....


(yep in that little thing!!)


I use mine all the time and it's so great when you don't want to carry a purse around!!

Friday, June 15, 2007

Ginormous Man Mitts


I'm sharing this pattern and hoping you have the knowledge that you know how to knit with the magic loop method or DPN's, as it doesn't explain everything.

The mitt will fit a big mans hand.

kfb - knit into the front and back of same stitch

With bernat bulky yarn a sisu sock yarn held together and a 24" 6.00mm circ

cast on 32 sts

k2 p2 rib for 15 rows

knit next row

knit even for 6 rows

starting thumb gusset

k14, kfb, k2, kfb, k14

knit around

k14, kfb, k4, kfb, k14

knit around

k14, kfb, k6, kfb, k14

knit around

k14, kfb, k8, kfb, k14

knit around

k14, kfb, k10, kfb, k14

knit around

k14, co 2 sts, put 14 (thumb) sts on holder, k14

knit around for 22 rows

*k4, k2tog* around

knit around

*k3, k2tog* around

knit around

*k2, k2tog* around

knit around

k2tog around

weave end thru the remaining sts and pull tight

Thumb

I picked up 2 sts where the 2 cast on sts are, the 14 sts from holder and picked up 2 more sts ( 18 sts)(this way the decs are on the inside seam)

knit around

k2tog, k14, k2tog

knit around

k2tog, k12, k2tog

k around for 7rows

k2tog around for 2 rows.

weave end thru the remaining sts and pull tight.

tuck in ends.

and make one more.

Little Baby Booties


The pattern is >here<

SHELL CUP AND SAUCER


MATERIALS:#10 crochet cotton (a main color and a contrast color)1.75mm hookhot glue gun
CUP:
with MC,ch6, join wth slst
R1- ch4, *dc in loop, ch1* 7 times slst in 3rd ch
R2- slst into ch sp, ch4, dc, ch1 into same sp in next ch sp *dc, ch1, dc, ch1* around join in 3rd ch
R3- repeat row 2
R4- slst into sp, ch3, dc in same sp, ch1 2 dc in same sp, *skip 2 sp, 2dc, ch1, 2dc in next sp* around slst in top of ch3.( when I got to the last shell I didn't have enough spaces so I worked it in the middle dc)
R5- slst into ch1 sp, ch3, dc in same sp, ch1 2 dc in same sp, in next ch1 sp, *2dc, ch1, 2dc* around slst in top of ch3
R6-10 repeat row 5
R11- repeat row 5 only working 3 dc instead fasten off.
R12- with CC slst in each st around, fasten off
HANDLE:
R1- with MC ch25, sc in second ch from hook and in each ch with 3 sc in end ch, work on the other side of the ch, with 2 sc in last ch.fasten off.
R2- with CC, slst in each st fasten off
SAUCER:
with MC repeat Rows 1 -3 of cup
R4- slst into sp, ch3, dc in same sp, ch1 2 dc in same sp, *skip one sp, 2dc, ch1, 2dc in next sp* around slst in top of ch3
R5- slst into ch1 sp, ch3, dc in same sp, ch1 2 dc in same sp, in next ch1 sp, *2dc, ch1, 2dc* around slst in top of ch3
R6-repeat R5
R7- slst into ch1 sp, ch3, dc in same sp, ch1 2 dc in same sp, in next ch1 sp, *2dc, ch1, 2dc, ch1* around slst in top of ch3
R8- repeat row 7
R9- slst into ch1 sp, ch3, dc in same sp, ch2, 2 dc in same sp, in next ch1 sp, *2dc, ch2, 2dc, ch2* around slst in top of ch3
R10- slst into ch1 sp, ch3, 2dc in same sp, ch1, 3 dc in same sp, in next ch1 sp, *3dc, ch1, 3dc, ch2* around slst in top of ch3. fasten off.
R11- with CC slst in each st around,fasten off.
Starch and block.hot glue handle to cup.
Please feel free to link to this pattern, and/or print it out for your own personal use, but do not copy it in any way to put on-line, pass out, or re-write without my permission. Any resemblance to any other pattern like this is purely coincidental. This pattern was written
July 23, 2004
Thank you, DandyLion

Lucky Penny Keychains

Butterfly
Butterfly LuckyPenny Keychain
( aprox 2 1/2 inches not including the loop)
you'll need a main color and a contrasting color
1.75mm hook
Covering Penny
Chain 5, join to form a ring.
Rnd 1: Ch 3, 11 dc in ring. Join to 3rd st of cha 3. (12 dc)
Rnd 2: Ch 1, 2 sc in same place and in each dc around. Join in back loop of first sc. (24 sc)
Rnd 3: Working in back loops of each sc, sc in same place and in each sc around. (24 sc)
Finish off leaving an 8 inch length for gathering.
Weave thread through each sc in front loops by inserting needed from back to front of each sc. Place penny on top of wrong side and pull thread tight to secure penny. Secure and hide end. Note: It helps to pull the thread tight in the first few stitches.
join with same color (MC) as penny holder, sc in same as joining, sc in next, ch6( antenna), 4 sc in second ch from hook, slst in the rest, sc in next 2 sc, ch6, 4sc in second ch from hook, slst in the rest, sc in the next 8, hdc in next, 2 dc in next, 2trc in next, 2 trc in next, 2 dc in next, hdc in next, sc in remaining, slst to first sc. fasten off, tuck in ends.
to make first wing:
join CC in 4th trc you made, sc in the same space, skip 1 st, 7dc in next, skip 1, sc in next, skip 2 st, 9 trc in next, skip 2 st, sc in next, ch3 turn,* sc in next, ch3* repeat to the end.slst, fasten off tuck in ends.
to make second wing:
join CC in 2nd sc next to the antenna on opposite side of the butterfly, sc in the same st, skip 2 st, 9trc in next, skip 2 st, sc in next, skip 1 st, 7 dc in next, ch3 turn, *sc in next, ch3* repeat to the end, slst, fasten off tuck in ends.
attach MC to back of penny holder, ch17, slst in each ch back, join end to back, fasten off tuck in ends.

Please feel free to link to this pattern, and/or print it out for your own personal use, but do not copy it in any way to put on-line, pass out, or re-write without my permission. Any resemblance to any other pattern like this is purely coincidental. This pattern was written
July 14 2004
Thank you, DandyLion


Flip Flop Keychain

Flip Flop Keychain
( aprox 2 inches not including the loop)
you'll need a main color and a contrasting color
Covering Penny
Chain 5, join to form a ring.
Rnd 1: Ch 3, 11 dc in ring. Join to 3rd st of cha 3. (12 dc)
Rnd 2: Ch 1, 2 sc in same place and in each dc around. Join in back loop of first sc. (24 sc)
Rnd 3: Working in back loops of each sc, sc in same place and in each sc around. (24 sc)
Finish off leaving an 8 inch length for gathering.
Weave thread through each sc in front loops by inserting needed from back to front of each sc. Place penny on top of wrong side and pull thread tight to secure penny. Secure and hide end. Note: It helps to pull the thread tight in the first few stitches.
Attach same color in one of the remaining loops of row 3
Row 1, ch1, sc in the same, and in next 9, ch1 turn. ( 10sc)
row2, skip 1st sc, sc in ramaining, ch1, turn. ( 9 sc)
row 3 -8 , continue row 2 until you have 5 sc, ch1 turn.
row 9, 2 sc in first sc, sc in next 3 sc, 2 sc in last, ch1 turn.
row 10, 2 sc in first, sc in next 5 sc, 2 sc in last, ch1 turn.
row 11, skip 1st sc, sc in each sc across skipping over second last sc, ch1 turn.
row 12, repeat row 11. ch1 but do not turn.
Row 13 and 14, sc in the ends of each row and around penny, increasing where nessasary so it will lie flat. don't join, just continue sc around, stopping at the top of the penny, ch17, slst back down the chain, sc in the next sc, joining in the end of the ch, to form a loop, continue sc around, slst to join, fasten off, tuck in ends.
refering to pic, attach CC just under the penny, ch7, slst where the big toe would be on top of the penny, ch8, slst on the other side of the penny near the bottom, turn, 10 sc along ch, slst in the big top at the top, 9 sc along the other chain, slst, fasten off, tuck in ends.

Please feel free to link to this pattern, and/or print it out for your own personal use, but do not copy it in any way to put on-line, pass out, or re-write without my permission. Any resemblance to any other pattern like this is purely coincidental. This pattern was written
July 14 2004
Thank you, DandyLion


FUZZY


Materials:
small amount sz 10 crochet cottonsz 1.75 aluminum hooksmall amount fizz yarn( or any other fuzzy yarn)
Row 1: ch6, *dc in first ch, ch2* repeat 4 times ( 6 spokes) join with slst to 3rd ch
Row 2: ch1, sc in same st as ch1, sc in each st around, (18 sc) join in first sc, fasten off.
make another one but DON"T fasten off!
on second ch1, then put the 2 wrong sides together, and sc in each sc through both ,increase in every 3rd sc, to keep it flat) remembering to add penny slst in first sc
ch16, slst in each ch, slst the end of the tail into then stitch ( add the key ring at this time).fasten off, tuck in ends.
join fizz yarn in any sc, and slst around, skipping over tail, join to first sc, fasten off, tuck in ends.
Please feel free to link to this pattern, and/or print it out for your own personal use, but do not copy it in any way to put on-line, pass out, or re-write without my permission. Any resemblance to any other pattern like this is purely coincidental. This pattern was written
July 13 2004
Thank you, DandyLion


Water Storage Solution

A Dandy Water Storage Solution

materials:
crochet cotton ( the dishcloth stuff)
5.00mm hook
comfy chair
cup of coffee

1. Take a sip of your coffee, ok take a huge gulp, cuz it's a iced capp, sit in your comfy chair and ch 4, slst into the first chain you made.

2. Chain 4, *dc into the ring, ch1, take another sip* continue this 7 times, then slst into the 3 ch.

3. slst into the space and ch4, dc in the same space, ch1, *dc, ch1, dc, ch1 into the next space* continue this around. slst into the 3rd ch.

4. slst into the space, and ch4, *dc in next space, ch1*continue around, slst into the 3rd ch

5. repeat #4 for 12 rows... 14 rows all together

6. slst into next space, chain 150, slst into a space on the opposite side, ch3, slst into the space next to the one you just did. *ch1, skip a ch, dc in next* continue this all the way across you will end with a dc in your first ch, slst in the space next to your first ch.

Finish off and tuck in ends and finish your iced capp admiring your new water storage solution unit!!

Please feel free to link to this pattern, and/or print it out for your own personal use, but do not copy it in any way to put on-line, pass out, or re-write without my permission. Any resemblance to any other pattern like this is purely coincidental. This pattern was written
June 3 2004
Thank you, DandyLion

Musical Note Bookmark

Musical Note Bookmark
ch5, join
ch2, 10 hdc in same as joining, 2 hdc in each hdc around, join
ch2, hdc in same as joining * 2 hdc in next hdc, 1 hdc in next* join
ch1, sc in next 8 hdc, ch23, hdc in 3rd ch from hook, hdc in next 10
ch2, turn hdc in next 4 hdc, skip one hdc, hdc in next 5 hdc
ch1, turn, sc across
ch2, hdc across side of the 2 hdc rows and down the chain, skip 1 hdc on circle and join with slst in next, slst in next 21 hdc
ch60, 10 hdc in 3rd ch from hook, join
ch8 hdc in 3rd ch from hook, hdc in next 3ch
ch1, 4sc down ch, join with slst, 4 slst in next 4 hdc, slst into ch and in next 56ch, join with slst. Finish off.

Please feel free to link to this pattern, and/or print it out for your own personal use, but do not copy it in any way to put on-line, pass out, or re-write without my permission. Any resemblance to any other pattern like this is purely coincidental. This pattern was written
Nov 27, 2003
Thank you, ©DandyLion

Kids Ruffles Touque

A Dandy Kids Ruffled Touque

you'll need 2 colors of yarn.... or 2 ball of the same... which ever colors you prefer
4.5 mm hook

Hat

ch4 join with slst
Row 1: ch3 (counts as dc) 11 dc in ch4 loop, join with slst. (12)
Row 2: ch3, 1 dc in same dc as ch3, 2 dc in each dc around, join with slst. (24)
Row 3: ch3, ( 2dc in next 2 dc, 1 dc in next) around, join with slst. (36)
Row 4: ch3, ( 1dc in next 3dc, 2 dc in next), join with slst. (54)
Rows 5 to 13: ch3, dc in each dc around. join with slst. (54)

Ruffle

Row 14: ch3, 2dc in each dc around, join with slst. (108)
Row 15: ch3, ( 1dc in next 2 dc, 2 dc in next dc) around, join with slst.
Fasten off.

Please feel free to link to this pattern, and/or print it out for your own personal use, but do not copy it in any way to put on-line, pass out, or re-write without my permission. Any resemblance to any other pattern like this is purely coincidental. This pattern was written
Oct. 13, 2003
Thank you, ©DandyLion

Towel Topper Idea ... no BUTTONS!


had this idea for a towel topper with no button, what I did was dec until I had 8 sts remaining, then made a 12 inch strap on 3 sts ( I used hdc, feel free to use what ever sts you'd like) then skip 2 sts, and slst the end to the next 3 sts.

you just wrap the tuck the towel around the oven handle!

Sponge Buddy Mitts


© PurpleDandyLion Dec 2/04
5.00mm hookyellow, white red blue brown yarn.... 4ply
Row1 - With brown ch10, sc in 2nd ch from hook and in each ch, ch1 turn
Row2 -20 in BLO sc in each sc, ch1 turn. don't ch1 on the last row, fasten off.
don't join the next rounds.. mark rows with stitch markerRow1 - With white sc 22 evenly aroundRow 2-3 sc in each. fasten off white, join yellow
Row 4 - *sc in 3 sts, 2sc in the next*5 times, sc in 1 st, 2 sc in the last st ( 28 )Row 5-7 - sc in each scrow8 -ch4 skip 4 sts, sc in the 5th st and in each st aroundRow9 -22 sc in each sc, fasten off. leave enough yarn to slst the top shut after you sew on the eye's and face... it's just easier this way ;~)
Join at thumb, sc around (I did 11sc) sc around for 9 rows, slst across to make the thumb square
EYES Make 2 with blue ch2, 6 sc in 1st ch. fasten off. Join white 2 sc in each sc, join and fasten off.
Last slst top of mitt shut

Sew on eyes and embroider face

Please feel free to link to this pattern, and/or print it out for your own personal use, but do not copy it in any way to put on-line, pass out, or re-write without my permission. Any resemblance to any other pattern like this is purely coincidental. This pattern was written
Dec 2, 2004
Thank you, DandyLion

Sponge Buddy Bag


This is my OWN ORIGINAL PATTERN, any resemblance to SpongeBob Square Pants is purley coincidental.

Measurments.. aprox. 4 1/2 X 5 1/2 inches not including handle

Materials: 5.0mm hook
yarn colors: yellow, white, brown, red, blue (small amounts of each)
yarn needle
* don't join rows, mark your rounds with a marker, always change yarn on the same side of the bag*
I broke this pattern down to rows
1-6 are brown
7-9 are white
10-24 are yellow
BAG:
Round 1-6 : With brown ch17, sc in 2nd ch from hook and in each ch across, then working on the side of the chain sc across, mark round, then continue working sc for 5 more rows with brown. (laying flat, judge on where to change to white on the side of the bag)
Round 7-9 : With white sc for another 3 rows, judge for yourself on where to change to yellow,
Round 10-13 : Continue sc with yellow for 4 rows, don't fasten off.
*Round 14 : making sure your on the side of the bag, start next round by ch10, sc in 2nd ch from hook and then sc in each ch, sc in each sc across the bag, on the other side of the bag, ch10, sc in 2nd, ch from hook and in each ch, sc until you come back to the first arm,
*Round 15 : holding the arm along the side, ch1 over the arm, continue sc across to the other arm, ch1 across this arm too, sc to finish round
*Round 16 : sc in each st (including ch1) around
Round 17-24, sc in each sc around.* Don't fasten off*
*to make handle*, loosley slst into row 23, ch55 (or however long you'd like the handle), slst in the other side of row 23, slst in every chain back to the other side. Fasten off. Tuck in ends.
EYES: make 2
Row 1 : with blue ch2, 6sc in 2nd ch from hook, Fasten off.
Row 2 : Join white, 2sc in each sc around, fasten off leaving enough yarn to sew on eyes on the bag.
Sew the eyes on near the top of the bag,(maybe down 2 rows from the top) over lap the eyes just a bit.
TIE:
Row 1: with red ch3, sc in 2nd ch from hook and in next ch, ch1 turn.
Row 2 : sc dec, ch1, turn
Row 3 : 2sc in the sc, ch1, turn
Row 4 : sc in sc, ch1,turn
Row 5 : sc in sc ch1,turn
Row 6 : sc dec, fasten off leaving enough yarn onto the bag.
when sewing onto the bag, start the tie at the top of the white rows, just under the yellow, and wrap the ayrn around the tie where the knot of the tie would be.
LEGS: making 2
With yellow attach the yarn 1/3 of the way into the bottom of the bag, ch11, sc in 2nd ch from hook and in each ch across, slst to the bag, Fasten off. tuck in ends
FACE:
with brown, embroider on a Spongy face, a big sideways nose and a HUGE spongy smile!!
ENJOY YOUR SPONGE BUDDY BAG!!

Please feel free to link to this pattern, and/or print it out for your own personal use, but do not copy it in any way to put on-line, pass out, or re-write without my permission. Any resemblance to any other pattern like this is purely coincidental. This pattern was written
June 14 2004
Thank you, DandyLion

One End Wristlette Bag

I used crochet cotton for this version.


I hate tucking in ends at the end of a project, this is made so that you only have 1 end to tuck in at the end!!
Materials:
crochet cotton ( the dishcloth stuff, of course if you use this you won't be able to felt it) or 4 ply wool aprox 275 yrdssmall amount of a second color4.5 mm hookyarn needle
** ch1 at the beginning of each row, this ch1 will NOT be counted as a stitch, your first sc of each row will be in the same stitch, you will also slst to join into the first sc of each row** unless otherwised stated
Do you have your stuff ready?? Ok, lets get hookin'!!
R1 - ch2,6 sc in the first ch (6)R2 - 2 sc in each sc (12)R3 - * 1sc, 2 sc in next* around (18)R4 - * 2sc, 2 sc in next* around (24)R5 - * 3sc, 2 sc in next* around (30)R6 - * 4sc, 2 sc in next* around (36)R7 - * 5sc, 2 sc in next* around (42)R8 - * 6sc, 2 sc in next* around (48)R9 - * 7sc, 2 sc in next* around (54)R10 - * 8sc, 2 sc in next* around (60)R11 - * 9sc, 2 sc in next* around (66)R12 - * 10sc, 2 sc in next* around (72)for the sides of the bag single crochet in the round (do not join the rows) for 6 inchesdo not fasten off.
with your stitch markers mark every 18 stitches, name these A,B,C and D
making the handles:
sc up to the first marker A , ch1 turn (18)sc dec in the first and last 2 sts, with one sc in each st between. (16)repeat this row 3 more times. (14)(12)(10)sc in each st arcoss ch1 turn (10)repeat this for 6 inchesincrease ( 2 sc ) in the first and last sts in the next 4 rows, until you reach 18 stitches again, fold the handle in half and make sure it's not twisted, start to slst the handle to the bag at stitch marker B, ( you may have to add a extra row of sc to start in the correct place).. slst across to stitch marker C, sc in the next st and in each stitch across to stitch marker D, and continue the second handle in the same way, making the second handle 12 - 14 inches long, slst this handle to the bag in the same way, starting at stitch marker D and slst to stitch marker A.
Tuck in the end.


this version I used 100% wool and felted the bag when I was done.


This pattern was also published in the crochet pattern a day calendar .

Crocheted Ball Cap

(looking for picture)


A Dandy Crocheted Ball Cap

Materials:

crochet cotton, you know the dishcloth stuff ;~)
and a 4.0 mm hook, a F for you not in Canada
plastic canvas
old ball cap for brim pattern

To make the brim for this cap just trace the brim of a old ball cap onto plastic canvas, or if you can buy a ball cap brim go ahead and use that.


I always like to ch1 at the beginning of each row, don't count this as a stitch.

chain 4 and slst to form a loop, ch1

1. 6 sc in the loop, slst in the 1st sc, ch1.

2. 2 sc in each sc around, ch1.

3. *sc in sc, 2 sc in the next*, join with slst in the first sc, ch1.

4. *sc in 2sc, 2sc in the next*, join with slst in the first sc, ch1.

5. * sc in 3 sc, 2 sc in the next*, join with slst in the first sc, ch1.

6.* sc in 4 sc, 2 sc in the next*, join with slst in the first sc, ch1.

7.* sc in 5 sc, 2 sc in the next*, join with slst in the first sc, ch1.

8.* sc in 6 sc, 2 sc in the next*, join with slst in the first sc, ch1.

9.* sc in 7 sc, 2 sc in the next*, join with slst in the first sc, ch1.

10. * sc in 8 sc, 2 sc in the next*, join with slst in the first sc, ch1.

11. * sc in 9 sc, 2 sc in the next*, join with slst in the first sc, ch1.

12. * sc in 10 sc, 2 sc in the next*, join with slst in the first sc, ch1.

13. * sc in 11 sc, 2 sc in the next*, join with slst in the first sc, ch1.

14. * sc in 12 sc, 2 sc in the next*, join with slst in the first sc, ch1.

15-33. sc in each sc around, join with slst to the first sc, ch1.

34. sc in both loops of the next 22 sc, sc in BLO of the next 37 sc, sc in both loops of the last 19 sc, ch1.

35. sc in each sc (both loops)ch1. fasten off.

ok now for the brim. Making 2.

1. go back to row 34 and in the first sc of the loops you missed join the yarn, ch1, sc in the same st as the ch and in each loop across. ch1. turn

2.skip 1sc, sc in the next 16sc, 3 sc in the nextsc, sc in the next 16sc, skip 1sc, sc in the last sc, ch1.turn

3. repeat row 2

4. skip 1sc, sc in next 9sc, 2sc in nextsc, sc in next 6sc, skip 1sc, sc in 6 sc, 2sc in next, sc in 9sc, skip 1sc, sc in next sc, ch1., turn

5. skip 1sc, sc in next 9sc, 2sc in next, sc in next 12 sc, 2sc in next, sc in 9sc, skip 1sc sc in next, ch1, turn

6. skip 1sc, sc in each sc around to 2nd last sc, skip it, and sc in the last sc, ch1, turn.

7. skip 1sc, sc in 9sc, 2sc in next, sc in 4sc, 2sc in next, sc in 4sc, 2sc in next, sc in 10 sc, skip 1, sc in last sc, ch 1, turn.

8. sc in each sc skipping second sc and 2nd last sc, ch1 turn.

9. skip 1, sc in 9 sc, 2 sc in next, sc in 9 sc, 2 sc in next, sc in 9 sc, skip 1, sc in next ch1, turn.

10. repeat row 8

11. repeat row 9

12. repeat row 8.

finish off. now for the second brim you will work in the front loops only of row 35 of the ball cap, attaching the yarn directly under where the other brim started, work this brim in the same way, Now if you want your hat to look like a ducks bill you can just leave it open ( you'll see what I mean when you get this far ;~)) or, just sc the brim shut, streching the brims over the plastic canvas, it should be a little snug. Tuck in all ends and enjoy your cap.

Please feel free to link to this pattern, and/or print it out for your own personal use, but do not copy it in any way to put on-line, pass out, or re-write without my permission. Any resemblance to any other pattern like this is purely coincidental. This pattern was written
May 26, 2004
Thank you, DandyLion

Crocheted Lightbulb Ornament


you need:
4 ply grey and scraps of other bright colors
4.5mm hook
polyfill
these will be about 2 to 3 inches long
* at the beginning of each row ch1and the first sc will be in the same st, and slst into the first sc to join*
1. with grey ch20, slst in 1st ch, ch1 6 sc in the same ch as slst, slst in 1st sc to join, ch1 turn.
2. 2sc in each sc do not turn.
3. ch1, in BLO, sc in each sc around.
4. sc in both loops around, fasten off, tuck in ends. ( or just crochet over top with the next color)
With Light Bulb color:
5. sc in each sc
6. * 1 sc , 2 sc in next st* around
7-10. sc in each sc
11. sc in sc, sc dec in next 2 sts
12-13. sc in each sc.
STUFF
14. repeat row 11
15. dec in every 2 sc, fasten off leaving yarn to sew tip shut.

Please feel free to link to this pattern, and/or print it out for your own personal use, but do not copy it in any way to put on-line, pass out, or re-write without my permission. Any resemblance to any other pattern like this is purely coincidental. This pattern was written Oct 30, 2004
Thank you, DandyLion

Firey Salsa BackPack


Materials:
acrylic 4 ply yarn, main color and a contrasting color3.5 mm hookyarn needlewooden beads if you like

** ch1 at the beginning of each row, this ch1 will NOT be counted as a stitch, your first sc of each row will be in the same stitch, you will also slst to join into the first sc of each row** unless otherwised stated

R1 - ch2,6 sc in the first ch (6)R2 - 2 sc in each sc (12)R3 - * 1sc, 2 sc in next* around (18)R4 - * 2sc, 2 sc in next* around (24)R5 - * 3sc, 2 sc in next* around (30)R6 - * 4sc, 2 sc in next* around (36)R7 - * 5sc, 2 sc in next* around (42)R8 - * 6sc, 2 sc in next* around (48)R9 - * 7sc, 2 sc in next* around (54)R10 - * 8sc, 2 sc in next* around (60)R11 - * 9sc, 2 sc in next* around (66)R12 - * 10sc, 2 sc in next* around (72)R13 - * 11sc, 2 sc in next* around (78)R14 - * 12sc, 2 sc in next* around (84)

10 sc in BLO ( this will be where you attach the handle afterwards)
sc in the round for 7 inches, on the next row add a dc drop stitch every 7th stitch, sc in the other stitches.
continue sc in each st for another inch, then sc until you are pretty much even with the BLO sts you made at the bottom of the bag and make 10 sc in BLO again marking this st. sc again for 3 rounds,
( you will be now making the flap) sc in 10 sts past the stitch marker, ch1 turn, in BLO 30 sc, ch1 turn,*in both loops 30 sc, ch1 turn* repeat until you have 3 inches for the flap, dec in the first and last 2 sts of each row until you have 12 sts.In the next row, dec, 2 sc, ch4, skip 4 sts, 2 sc, dec, ch1 turn, continue the dec for 2 more rows with a sc in each of the chs.
attach yarn at the first st of the BLO, *10 sc, ch1 turn,* repeat for 24 inches, join with stsl to the other row of BLO.

Fasten off, tuck in ends.

With a second color reverse sc around the flap, bag opening and the sides of the handle.

for tie ch aprox 80 and fasten off, add your wooden beads to the end, weave in and out of dc drop stitches, on the front of the bag position flap to where you want the button closure, sew on bead, sew on wooden ring on the back just above the strap.

Please feel free to link to this pattern, and/or print it out for your own personal use, but do not copy it in any way to put on-line, pass out, or re-write without my permission. Any resemblance to any other pattern like this is purely coincidental. This pattern was written
July 28, 2005
Thank you, PurpleDandyLion

Janas Mitts

For this pattern I won't put the color changes in the pattern, you can change colors when ever you want or just make them plain.

Materials:
4.5 mm hook
worsted weight yarn
yarn needle
** the ch1 in the pattern does not count as a stitch, the first stitch goes into the same stitch as ch1**
Cuff:
Row 1. ch11, sc in the first ch from hook and in the next 9, ch1, turn. (10)
Row 2. in back loop only, sc in each sc, ch 1, turn. (10)
Row 3 - 26. repeat row 2, I had 13 ridges when I was done.
slst the ends together.
Starting the mitt:
Row 1. sc 32 evenly around cuff, join to first sc, ch1 turn.
Row 2 - 5. sc in each sc
Row 6. sc in first sc, increase in the next, sc until the second last sc, increase, sc in the last, join, ch1. (34)
Row 7. sc in 2 sc, increase in the next, sc until the 3rd last sc, increase, sc in the next 2, join, ch1. (36)
Row 8. sc in 3 sc, increase in the next, sc until the 4th last sc, increase, sc in the last 3, join, ch1. (38)
Row 9. sc in 4 sc, increase in the next, sc until the 5th last sc, increase, sc in the last 4, join, ch1. (40)
Row 10. sc in 5 sc, increase in the next, sc until the 6th last sc, increase, sc in the last 5, join, ch1. (42)
Row 11-15. sc in each sc, ch1, fasten off.
Row 16. skip 7 sc, join yarn ch1 and sc in the same st, sc in 29 sts, ch6, join to first sc in that row, ch1. (30)
Row 17 - 35( or longer if you have bigger hands). sc in each sc, join ch1.
decreasing at the top:
Row 36. sc in first st, *sc dec in next 2sts, sc in 4* repeat around
Row 37. sc in first st, *sc dec in next 2sts, sc in 3* repeat around
Row 38. sc in first st, *sc dec in next 2sts, sc in 2* repeat around
Row 39. sc in first st, *sc dec in next 2sts, sc in 1* repeat around
Row 40. sc dec around. cut yarn leaving enough to weave through sts and tie off.
Thumb
Sc evenly around hole doing a sc dec in the corners.
Sc in each sc for 8 or 9 rows, then dec around, cut yarn, leaving enough to weave through sts and tie off.

Tuck in all ends, turn inside out and brush the mitt. this makes it soft and fuzzy .
Enjoy your new mitts!!
Please feel free to link to this pattern, and/or print it out for your own personal use, but do not copy it in any way to put on-line, pass out, or re-write without my permission. Any resemblance to any other pattern like this is purely coincidental. This pattern was written
October 13, 2005
Thank you, PurpleDandyLion

Flower Facecloth


Materials:
crochet cotton (2 colors)
5.00 mm hook
yarn needle

Lets start:
at the beginning of each row ch1, this doesn't count as a stitch, place your first stitch of each row in the same spot. Join with a slst to the first st of the row.

Row 1: ch2, 6 sc in first ch
Row 2: 2 sc in each sc
Row 3: *sc in 1 st, 2 sc* around
Row 4: *sc in 2 st, 2 sc* around
Row 5: *sc in 3 st, 2 sc* around
Row 6: *sc in 4 st, 2 sc* around
Row 7: *sc in 5 st, 2 sc* around
Row 8: *sc in 6 st, 2 sc* around
Row 9: *sc in 7 st, 2 sc* around
Row 10: *sc in 8 st, 2 sc* around
fasten off, you should have 60 sts.

Petal 1:
Row 1: Join with CC in any stitch, ch1, sc in 13 sts
Row 2-8: sc in each sc across
Row 9 - 13: sc dec in first and last 2 sts of the row, sc in each in between.
you should have 3 sts on the final row.
fasten off

Petal 2 - 5:

Join in the last stitch of the last petal and repeat the same as petal 1.

Outline:
Join main color in any stitch and sc evenly around the flower.

Tuck in the ends and Enjoy!

Please feel free to link to this pattern, and/or print it out for your own personal use, but do not copy it in any way to put on-line, pass out, or re-write without my permission. Any resemblance to any other pattern like this is purely coincidental. This pattern was written
August 18, 2005
Thank you, PurpleDandyLion

Butterfly Pencil Topper


Materials:
#10 thread in solid, varigated and brown
1.75mm hook
hot glue

BUTTERFLY
with varigated ch5 join with slst.
row1 - ch3, 2dc, ch2 * 3 dc, ch2* repeat 6 times
( you'll have 8 groups of 3dc) join to top of ch3
fasten off.
row2 - join solid color in second dc of any dc group, sc, 8 dc in ch2 space * sc in 2nd dc of next dc group, 8 dc in ch2 space* continue around join with slst to 1st sc. fasten off
row3 - join varigated in any st, sc around. slst to join.
tuck in ends.
fold butterfly in half.
ANTENAE & BODY
with brown, ch5( leaving about 10" of thread, this will be for the antenae), slst in the bottom of the butterfly between the 2 wings, ch 5, slst to the first ch, ch7 sc in 3rd ch from hook, fasten off. now with the 10" of thread ch7 again, sc in 3rd ch from hook, fasten off... tuck in ends.
TOPPER
now with solid color, ch11, sc in second ch from hook and in each ch, ch1 turn,
* sc across, ch1 turn* repeat for 11 or so rows... until it fits around the pencil, fasten off thread leaving enough to sew up the side and weave thru the top.
hot glue the butterfly on the topper
add to pencil...
Please feel free to link to this pattern, and/or print it out for your own personal use, but do not copy it in any way to put on-line, pass out, or re-write without my permission. Any resemblance to any other pattern like this is purely coincidental. This pattern was written Aug16, 2004
Thank you, DandyLion

Santa Head Ornament


Materials:
4 ply yarn... in pink, white, red and black... (very little of each)
4.5mm hook
yarn needle
ok ready...lets start:
1 - with pink ch4, (leaving a long enough string so you can make a french knot nose after) 7dc in 1st ch, joining white in the last part of your last dc, do 8 dc in white and join to the 3rd of the begining ch.
2 - now In FLO ( front loop only) ch1, sc in the same st, continue scing across the pink stitches and into the 1st white dc, *ch3, slst into the next st* across, join in the first sc, fasten off. You just made Santas beard.
1 - With santas head facing you and with red and in BLO ( back loop only) skip 2 sc , and join in the next st, ch3, 4 dc across.ch3 turn.
2 - dc dec in next 2 sts, 2dc, ch3 turn
3 - dc, dc dec in next 2 sts, dc, ch3 turn
4 - dc dec in 2 sts, dc. fasten off.
Tuck in all ends, add a small pom pom to the top of Santas hat.
With the beginning yarn add a french knot nose. With black sew on 2 french knot eyes.
Don't forget to hang it on the tree and wait for that jolly soul to arrive!!

Please feel free to link to this pattern, and/or print it out for your own personal use, but do not copy it in any way to put on-line, pass out, or re-write without my permission. Any resemblance to any other pattern like this is purely coincidental. This pattern was written Nov 18, 2004
Thank you, PurpleDandyLion

FootThings, Necklace and Bracelet

Foot Things ( make 2 )
string 24 beads onto sz #10 thread I used a 1.75mm hook for all the patterns
ch104 *bead, ch1, 4slst, ch9, * repeat 11 times ( you should have 12 beads hanging, from the back of your ankle to just about to your second toe)
ch25 ( or however many you need to get around your second toe)
sc in same st as last slst, ch4, bead, ch1, 4 slst, sc in next ch, sc in next 5 chs ( untill you get to the next slst in ch), ch4, bead, 4slst, hdc in next ch, hdc in next 5 chs ( untill you get to the next slst in ch), ch4, bead, 4 slst, dc in nect ch, 5 dc ( until you come to the next sc)
ch4,* bead,ch1, 4 slst, ch9* repeat 8 times
ch100
fasten off... I cut the thread somewhat close to the knot and added a bit of clear nail polish so it wouldn't come undone.
Chokerthread about 30 beads
attach little snap to thread, ch4, *bead, ch1, 4slst, ch9* repeat untill it fits around your neck comfortably, ending with ch4, fasten off leaving enough thread to attach other part of snap, tuck in ends, and add clear nail polish to knots.
Braceletthread about 14 beads
same as choker but smaller... ;~)

Please feel free to link to this pattern, and/or print it out for your own personal use, but do not copy it in any way to put on-line, pass out, or re-write without my permission. Any resemblance to any other pattern like this is purely coincidental. This pattern was written Sept 23, 2004
Thank you, DandyLion

Sock Yarn Gloves

Sock Yarn Gloves

4.00 mm hook 2 balls of sock yarn... a color for the cuffs and another for the glove part( or 2 of the same if you want your gloves like that)
Lets start:
Cuff:ROW 1 - ch12, sc in 2nd ch from hook and in each ch.ch1 turn (11sc)Row 2 - 34, working in BLO( back loop only) sc in each sc, ch1 turnslst the ends of the cuff together, ch1 and evenly stitch 48 sc around cuff.( this is where I changed the color, feel free to change where ever your like ;~))
working up the hand, continue sc around for 17 rows.
to make the thumb hole:ch2, skip 10 sts, and continue sc around for 8 more rows
Index Finger:( fold glove in half so the thumb hole is in half and the stitches are even, this will help to find where to start the first row of the index finger)6 sc, ch2, skip 28 sc, sc in another 6 sts, continue sc around in each st (including the ch2) untill you reach the tip of the finger, then decrease around, fasten off leaving enough yarn to sew the top shut.
Middle Finger: join yarn in the last sc before the ch2 of the index finger.sc in next 5 sts, ch3, skip 17 sts, sc in 5 sts, 3 sc in the bottom of the ch2 of the index finger.continue sc around in each st (including the ch3) untill you reach the tip of the finger, then decrease around, fasten off leaving enough yarn to sew the top shut.
Ring Finger: join yarn in the last sc before the ch3 of the middle finger.sc in the next 4 sts, ch3, skip 9 sts, sc in the next 4 sts, and 3 sc in the ch3 of the middle finger.continue sc around in each st (including the ch3) untill you reach the tip of the finger, then decrease around, fasten off leaving enough yarn to sew the top shut.
Little Finger: join yarn in the last sc before the ch3 of the ring finger.sc in the remaining sts and 4 sc in the bottom of the ch3 of the ring finger. continue sc around in each st (including the ch3) untill you reach the tip of the finger, then decrease around, fasten off leaving enough yarn to sew the top shut.
Thumb: join yarn and sc around and 4 sc in ch2. continue sc around in each st untill you reach the tip of the finger, then decrease around, fasten off leaving enough yarn to sew the top shut.
Turn glove inside out and sew finger tips shut.

( I never tested the variations, just something I worked out in my head... if you find something wrong, please e-mail me so I can fix it)
Open finger Variation:only sc for 6 rows of each finger and thumb. fasten off and tuck in ends.
Flip Glove: ( for this method keep in mind that you'll have to do the BLO sts on different sides of each glove, unless you have 2 left hands... lol...) after you make the thumb hole, continue sc for 2 more rows, fold glove in half and sc for 2 or 3 sts so your working on the back of the hand, and in BLO, sc for 18 sts, then finish off the glove as for the open finger variation, but finish off the thumb, and sew the top shut.Join yarn in front loop of the other sts, and sc in each of the 18 sts, ch26 join with sc in the first sc, continue sc around until you reach the tips of the index and ring fingers, then decrease around until you cover the top of your middle finger, fasten off and sew up top.work as for open finger variation but finish thumb off.

Please feel free to link to this pattern, and/or print it out for your own personal use, but do not copy it in any way to put on-line, pass out, or re-write without my permission. Any resemblance to any other pattern like this is purely coincidental. This pattern was written Sept 12, 2004
Thank you, DandyLion

Peppermint Peekers

The Pattern can be found at Crochet Me

Snow Bunny Hat


The pattern can be found at Crochet Me

Pinky The Worm Bookmark

Pinky The Work Bookmark


#10 cotton thread1.75mm hook2 seed beads... your choice of colorneedle
ch4 join, ch2, 12 dc in ring.. join to 1st dcch2, 2 dc in each dc, join to 1st dc
ch 72, hdc in 3rd ch from hook, hdc in next 2 ch,* 3 hdc in next ch, hdc in next 3 ch, skip 2 ch, hdc in next 3 ch* repeat from * to head.slst into 2nd dc above ch, slst into 2 dc, turn, hdc in last hdc you made, hdc in next 3 hdc* 3 hdc in middle hdc from prev row, hdc in next 3 hdc, skip 2 hdc, hdc in next 3 hdc* repeat from * ch 1 turn, sc in each st, contunue sc around head untill you come to the part where you want the antenae, ch6, slst in each ch, sc in next st, ch6 slst in each ch, continue sc around head and the rest of the body, join in the first sc, fasten off. tuck in ends.
eyes.... ch2, 6 sc, join, fasten off, leaving enough thread to sew eye on head also sew bead onto place. make one more..sew on a smile
Aug 12/04

Please feel free to link to this pattern, and/or print it out for your own personal use, but do not copy it in any way to put on-line, pass out, or re-write without my permission. Any resemblance to any other pattern like this is purely coincidental. This pattern was written Aug12, 2004
Thank you, DandyLion

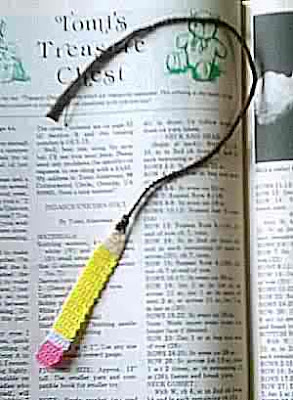
Pencil Bookmark

Pencil Bookmark
# 10 thread colors... pink, silver( i used the white with the silver running thru it) yellow, ecru and brown1.75mm hook
with pink ch6, sc in 2nd and each ch ( 5sc) ch1 turnrepeat for 5 rows, fasten off pink join silver
with silver continue sc for 2 rows, fasten off silver join yellow
with yellow sc for 23 rows, fasten off yellow join ecru
with ecru sc acrosssc, sc, sc dec, sc, ch1 turnsc across, ch1 turnsc, sc dec,sc, ch1 turnsc across fasten off ecru join brown
with brown, sc, sc dec, ch1 turnsc dec, ch 75, slst in each ch, join with slst to sc.fasten off. tuck in ends
with brown add a small tassle to the end
Aug 12/04

Please feel free to link to this pattern, and/or print it out for your own personal use, but do not copy it in any way to put on-line, pass out, or re-write without my permission. Any resemblance to any other pattern like this is purely coincidental. This pattern was written Aug12, 2004
Thank you, DandyLion

Flower Wrist Pincushion

FLOWER WRIST PINCUSHION
#10 crochet cotton ( main color and contrast color)1.75mm hookenough 1/8th" elastic to go around your wrist comfortablyneedle and thread, a small amount stuffingpop bottle caphot glue
row1 - with MC, ch3, 8 hdc in first ch, join in 1st hdc, ch1
row 2 - 2 hdc in each hdc, join in 1st hdc,ch1 ,
Row 3 - *1hdc in hdc, 2 hdc in next * around, join in 1st hdc, ch1
row 4 - * hdc in 2 hdc, 2 hdc in next* around, join in 1st hdc, ch1
row 5 - in BLO, hdc in each hdc, join to 1st hdc, ch1
row 6 - in both loops, hdc in each hdc around join, ch1
row 7 - repeat row 6
row 8 - repeat row 5, but ch2
ok, now stuff the bottle cap firmly, and put it inside your cuplooking thing..lol...with the open part of the bottle cap towards the bottom of the cup.
row 9 - dc in every second hdc, join in 1st dc, fasten off leaving enough thread to weave thru the dc and putt tight.secure with knot, tuck in ends.
With CC attach thread to any free st from row 5.
petal, *ch4, trc in same, 2 trc in next, trc in next( leaving the last loop from the trc's on hook, YO, pull thru all 5 loops on hook) ch4, slst in same, slst in next st* repeat around, making 11 petals, fasten off, tuck in ends.
now with your elastic, measure it around your wrist, cut, and sew the ends together making a loop.
now with the CC sc around the elastic loop, scing close together to totally cover elastic, join to first sc, fasten off tuck in ends,
hot glue (or sew) pincushion to elastic

Please feel free to link to this pattern, and/or print it out for your own personal use, but do not copy it in any way to put on-line, pass out, or re-write without my permission. Any resemblance to any other pattern like this is purely coincidental. This pattern was written July 25, 2004
Thank you, DandyLion

Thursday, June 7, 2007

Sponge Buddy Hat

© PurpleDandyLion Dec 29/04
5.00mm hookyellow, white, red, blue, brown yarn.... 4ply
Row1 - With brown ch10, sc in 2nd ch from hook and in each ch, ch1 turn
Row2 -66 in BLO sc in each sc, ch1 turn. don't ch1 on the last row, fasten off.
( you will have 33 ridges)
slst the seam together, then sc in the end of each row... (66)Row1-3 - With white hdc in each sc around, fasten off white.Row 4 - 22 with yellow, hdc in each. fasten off leaving plenty of yarn to sew up top of head after you sew on the face and eyes.
EYES:
With blue, ch3, 10 hdc in first ch, fasten off, join white, ch2, 2 hdc in each hdc, join to first hdc and fasten off leaving enough yarn to sew on to hat.
Sew on eyes and embroider face
TIE:
all I did for the tie is crochet a rectangle shape, and while sewing it on, I tightened it in the middle where the knot would be.


Please feel free to link to this pattern, and/or print it out for your own personal use, but do not copy it in any way to put on-line, pass out, or re-write without my permission. Any resemblance to any other pattern like this is purely coincidental. This pattern was written
Dec 29, 2004
Thank you, DandyLion